

The Oak Course was designed and built in 1974 by famed golf course architect, Joe Lee. The Oak Course was ranked #1 in Louisiana in 1985 by Golf Digest with the #1 hole in Louisiana for many years in the tricky par 5 - 15th hole.
Prior to Joe Lee constructing the Oak Course and Clubhouse, William Penick an attorney and owner of the HG Hills Supermarkets purchased the land in the 1930's and built a large Colonial Home appropriately named Beaux Chênes for the row of live oaks that connected the home to what is now Highway 22. Penick also built a three hole golf course along the Tchefuncte River. In the 1960's William Right, Mark C. Smith and his son purchased the land and created a new 18 hole golf course development named Beaux Chênes. The original course was designed and centered around the Penick Plantation as both the clubhouse and the sales office.
Morgan Earnest and Lester Kabacoff purchased the land in 1972 from the Smiths and Wrights. They immediately began designing and building what is now the Oak Course, Beau Chene Office Park I and the Beau Chêne Clubhouse, East of the Penick Plantation. During construction, Earnest and Kabacoff continued use of the original course and used the Penick Plantation for their sales office.
By the end of 1975, Morgan and Lester opened the new 18-hole Oak Golf course at Beau Chêne. The only hole that remained untouched and part of the current design today is #7 Oak, a relatively long straight away par 4 for the time with large Oak trees immediately off the fairways. The boat house on #5 is part of the original Penick Plantation which was damaged in Hurricane Katrina and rebuilt in 2007.
The Weiss Plantation resides in the hair pin dog leg right on hole #12 with views of the 13th hole and 14th tee box on the other side. The Weiss Plantation was designed by Leon C. Weiss for both Huey Long and Dick Lesch to "entertain" their Baton Rouge friends. The Pigeonnaire at the piont of 12 Oak is often bombarded with balls and is the inspiration for the neighboring home which looks like an oversized pigeonnaire many long hitters use to hit to the green on 12 Oak. Weiss also had a stable for his horses which was converted by Lester Kabacoff into a second home directly off the 3rd tee box.
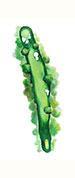
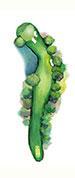
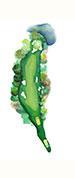
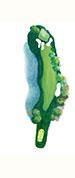
Hole # 1 | Par 5
| Course | Tees | Yardage |
|---|---|---|
|
Black
|
500 |
|
White
|
480 | |
|
Green
|
475 | |
|
Blue
|
470 |
The opening hole has a generous driving area. The ideal drive is the left side of the fairway leaving a mid iron for your lay-up to set up a short approach shot. The green is protected by two large bunkers. Big hitters with a good drive can have a go for this green in two, but be willing to pay the price of any miscalculation.
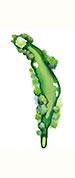
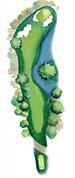
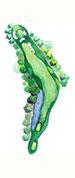
Hole # 2 | Par 3
| Course | Tees | Yardage |
|---|---|---|
|
Black
|
195 |
|
White
|
180 | |
|
Green
|
175 | |
|
Blue
|
170 |
This hole requires a well-struck long iron to the only Beau Chêne par three that doesn't have water on it. A deep bunker that fronts the right side of this green and a bunker that will catch any shots long and left guard the green. Par is a good score here!
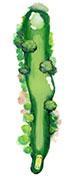
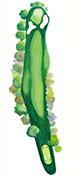
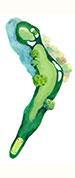
Hole # 3 | Par 4
| Course | Tees | Yardage |
|---|---|---|
|
Black
|
390 |
|
White
|
370 | |
|
Green
|
365 | |
|
Blue
|
360 |
This mid-length par four can play tough if your drive goes too far right from the tee. There is more fairway to the left than is apparent, so avoid both the bunker and oak trees that guard the right side of this fairway. This will leave you a mid to short iron to a very large green.
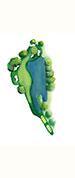
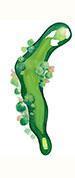
Hole # 4 | Par 4
| Course | Tees | Yardage |
|---|---|---|
|
Black
|
370 |
|
White
|
360 | |
|
Green
|
355 | |
|
Blue
|
350 |
This relatively short par four requires finesse rather than strength off the tee. A beautiful lake protects this hole on the left. With a fairway that slopes right to left golfers must hit an accurate tee shot that will leave a mid-iron approach to a slightly elevated green.
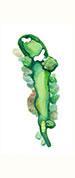
Hole # 5 | Par 3
| Tees | Yardage |
|---|---|
|
Black
|
158 |
|
White
|
130 |
|
Green
|
120 |
|
Blue
|
110 |
This picture sque par three is our signature hole?and is loaded with trouble! A large bunker fronts the green and another bunker lies behind the green. Wind coming off the Tchefuncta River to the right of this green tends to swirl so be sure of your club selection.
Hole # 6 | Par 5
| Course | Tees | Yardage |
|---|---|---|
|
Black
|
515 |
|
White
|
500 | |
|
Green
|
490 | |
|
Blue
|
485 |
This dogleg left par five is a three-shot hole and requires an accurate approach shot to this two-tiered green, which offers difficult pin positions. The smart play here is to keep your golf ball in the fairway both off the tee and on your approach shot.
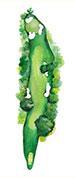
Hole # 7 | Par 4
| Course | Tees | Yardage |
|---|---|---|
|
Black
|
410 |
|
White
|
390 | |
|
Green
|
385 | |
|
Blue
|
380 |
This long par four requires a strong drive, preferably to left-center to guard against the fairway bunker on the right side. The second shot here will require a mid to long iron to a slightly elevated green that slopes from back to front. A par on this hole is a good score.
Hole # 8 | Par 4
| Course | Tees | Yardage |
|---|---|---|
|
Black
|
380 |
|
White
|
360 | |
|
Green
|
275 | |
|
Blue
|
270 |
This short par four requires an accurate, well-placed drive off the tee. The entire right side of this fairway is bordered by a beautiful lake that cuts in front of the green, making the approach shot a forced carry to a green that slopes from back to front. Both the tee shot and approach shot on this hole are intimidating.
Hole # 9 | Par 4
| Course | Tees | Yardage |
|---|---|---|
|
Black
|
430 |
|
White
|
410 | |
|
Green
|
335 | |
|
Blue
|
330 |
This is a great finishing hole for the outward nine, requiring a long drive to the center of the fairway, which leaves a demanding approach shot to this well-protected green. Take par on this difficult hole and move on.
Hole # 10 | Par 5
| Course | Tees | Yardage |
|---|---|---|
|
Black
|
510 |
|
White
|
490 | |
|
Green
|
480 | |
|
Blue
|
475 |
This is a good par five that allows the big hitters to gamble and attempt to reach this green in two. For most golfers though, the smart play is to lay-up and leave a short pitch shot to the green to make your birdie the more traditional way.
Hole # 11 | Par 4
| Course | Tees | Yardage |
|---|---|---|
|
Black
|
430 |
|
White
|
405 | |
|
Green
|
400 | |
|
Blue
|
390 |
This is a long difficult par four and is often considered the toughest hole on the course. This hole requires a long left to right drive that will leave a mid to long iron to a very flat green. A deep bunker fronts the green. If you leave this hole with a par you have picked up a shot to the field.
Hole # 12 | Par 4
| Course | Tees | Yardage |
|---|---|---|
|
Black
|
370 |
|
White
|
350 | |
|
Green
|
345 | |
|
Blue
|
335 |
Good positioning off the tee is essential on this severe dogleg right par four. Accuracy is more important than power on this short hole, requiring a tee shot of 220 yards to the left center of the fairway. That will leave you with a very delicate approach shot to a green that is surrounded by bunkers.
Hole # 13 | Par 3
| Course | Tees | Yardage |
|---|---|---|

|
Black
|
175 |
|
White
|
150 | |
|
Green
|
145 | |
|
Blue
|
140 |
This is a very demanding par three that requires proper club selection. Bunkers, both in the front and the rear, guard a very shallow green. The tee shot is over water and the wind generally swirls.
Hole # 14 | Par 4
| Course | Tees | Yardage |
|---|---|---|
|
Black
|
360 |
|
White
|
340 | |
|
Green
|
335 | |
|
Blue
|
330 |
Distance can be deceiving! Don't let the short length of this hole lure you to sleep, as this par four requires a accurately placed drive to a narrow fairway that is protected by a fairway bunker on the right and a cypress lake that runs the length of the hole down the left. After avoiding trouble off the tee with a well placed drive, the approach shot is to a slightly elevated green that slopes from back to front.
Hole # 15 | Par 5
| Course | Tees | Yardage |
|---|---|---|
|
Black
|
525 |
|
White
|
505 | |
|
Green
|
445 | |
|
Blue
|
440 |
This par five is a difficult driving hole due to the hazard on the left, which makes you aim further right than needed. Ideally you want to aim for the right-center of the fairway. That will leave you with a long iron to lay-up. The green is protected by a front bunker as well as a greenside bunker guarding the left side.
Hole # 16 | Par 3
| Course | Tees | Yardage |
|---|---|---|

|
Black
|
205 |
|
White
|
160 | |
|
Green
|
125 | |
|
Blue
|
120 |
The longest par three on the course plays even longer because the entire hole requires a carry over water. This green is very deep and, depending where the pin is located, it can be as much as three clubs' difference from front to back. Club selection is very important on this devilish par three.
Hole # 17 | Par 4
| Course | Tees | Yardage |
|---|---|---|
|
Black
|
380 |
|
White
|
350 | |
|
Green
|
345 | |
|
Blue
|
345 |
This par four requires a long drive to the right-center which will allow for an open look to the green guarded by a lake on the left and a very large bunker on the right. This is a very deep green and proper club selection is important for your approach shot. A large oak tree protects the left side of the fairway and green so try to avoid the left side if you wish to make par.
Hole # 18 | Par 4
| Course | Tees | Yardage |
|---|---|---|

|
Black
|
415 |
|
White
|
395 | |
|
Green
|
350 | |
|
Blue
|
340 |
Aim it down the middle, be committed to your shot, and let it rip! This is a very difficult finishing hole with fairway bunkers on both sides and a winding water hazard that runs the entire length of the fairway on the left. The ideal landing area is between the two fairway bunkers that will leave you with a mid-iron approach shot to the green.
